Building a Decentralized Blog dApp — Kwil SDK Demo (Updated)

The Kwil JS/TS SDK is the quickest and easiest way to integrate a decentralized relational database into your application.
Note: This blog has been updated to include the new functionality provided in the Kuneiform Release
The possibilities of decentralized relational data are endless — today, developers can use Kwil to create new Web 3.0 social media, analytics, trading, IoT, and even decentralized science platforms. If you are looking to get started building with Kwil right away, check out our documentation and demo video here.
In this blog, I will showcase the capabilities of the Kwil SDK through a simple decentralized blogging dApp. This dApp will have full CRUD functionality and will allow users to:
- Fund database interactions
- Insert records into the database when a user creates a new blog post
- Update or delete blog posts
The technical stack used for this application will be:
- React
- EthersJS v6
- Kwil SDK
I will also use Material UI to help with styling.
PS: You can see the source code for this app and run it in your local environment from our Github here.
Initial Setup
To start, let’s initialize the application with “npx create-react-app” and install the dependencies:
npm i kwil ethersEthers v6 removed polyfills for many of its dependencies. With create-react-app, you may need to include the polyfills in your webpack configuration. Check out this tutorial for an easy overview of implementing these polyfills (without having to eject your React application).
After setting up the initial application, we must create a new WebKwil class to manage all interactions with the Kwil network. In the WebKwil class, we pass in a Kwil Provider (you can find the latest Kwil Provider in our docs here):
// src/webKwil.js
import { WebKwil } from 'kwil'

export const kwil = new WebKwil({
 kwilProvider: "https://provider.kwil.com",
});
Funding Interface
First, let’s make an interface for funding the database. Before any user can execute CUD operations, they must deposit funds into a Kwil funding pool. Currently, you can receive testnet Kwil tokens from our faucet.
The first step in all funding interactions is to call the .getFunder() method. For simplicity, we will have users approve and deposit funds through one interface in the application.
In the deposit functions, I have also defined a helper function, converToBigNumber(), to convert the token amount to the appropriate amount in wei (18 decimal points). You can view the helper function in the ./utils/formatEther file.
You can find the FundingInterface.js file here.
// src/components/body-components/FundingInterface.js

import { kwil } from "../../webKwil";
import { convertToBigNumber } from "../../utils/formatEther";
import { BrowserProvider } from "ethers";

export default function FundingInterface() {
 /* other code */

 async function approveFunds(provider, amount) {
   const funder = await kwil.getFunder(provider);
   return await funder.approve(convertToBigNumber(amount);
 };

 async function depositFunds(provider, amount) {
   const funder = await kwil.getFunder(provider);
   return await funder.deposit(convertToBigNumber(amount));
 };

 /* other code */
};
Next, I will add a function to call the Kwil network and return the balance available to be spent on CRUD operations.
// src/components/body-components/FundingInterface.js
import { kwil } from "../../webKwil";
import { convertToBigNumber } from "../../utils/formatEther"
import { BrowserProvider } from "ethers"

export default function FundingInterface() {
 /* other code */

 async function approveFunds(provider, amount) {
   const funder = await kwil.getFunder(provider);
   return await funder.approve(convertToBigNumber(amount);
 };

 async function depositFunds(provider, amount) {
   const funder = await kwil.getFunder(provider);
   return await funder.deposit(convertToBigNumber(amount));
 };

 async function getAvailableBalance(provider) {
   const address = (await provider.getSigner()).address;
   const acct = await kwil.getAccount(address);
   return acct.data.balance
 };
 /* other code */
};
And that is it! We can now approve/deposit funds and view the amount of funds available for use
If you are using the demo application, your funding interface will look like this:
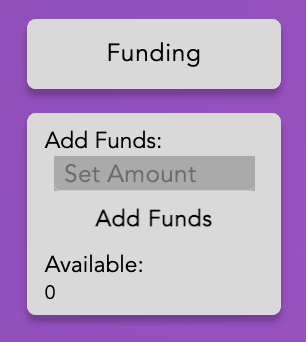
Creating a Database
For our application, we will need to create a single database on Kwil that all users will interact with when they use the blogging app.
You can think of Kwil databases as smart contracts for relational data. DApp developers can create tables and define queries for those tables. Once those queries are defined, the developer can set the rules for who can use the query. Once the database is deployed, any user can interact with the database within the rules defined by the original developer.
For the blogging dApp’s database, we can deploy it via the Kuneiform IDE. Kuneiform is Kwil’s DDL for creating and deploying schemas. Kuneiform is easy to learn — if you know SQL, you should be able to get started in just a few minutes.
P.S. Check out a Kuneiform overview here.
In the Kuneiform IDE, let’s start by adding some testnet tokens to the funding pool. Next, create a new file called “blog.kf”.
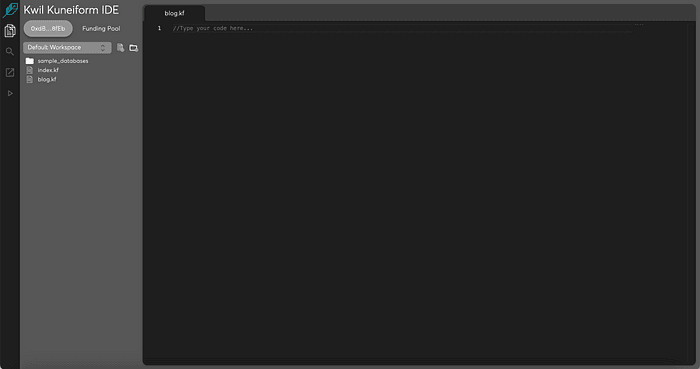
P.S. You can see the full Kuneiform file here.
Next, give the database the name “blog_dapp”. Make sure that the database name is followed by a semi-colon.
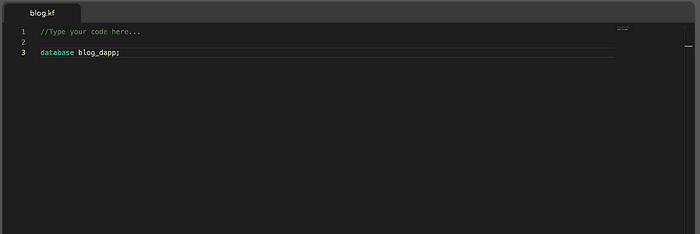
For our database, we will have two tables — one table to keep track of the different blog names (e.g. the Token Blog, the Cooking Bog, the Traveling Blog, etc.), and one table to keep track of all the individual blog posts. Note that these tables are not perfectly normalized but are instead made to showcase Kwil functionality.
The first table, “blogs,” will have two columns: id and blog_name. For each column, there is the option to add “attributes.” Attributes apply properties and constraints to a column. Note that the “id” column is type “int” with the attributes “primary and “notnull” and the “blog_name” column is type “text” and has a “notnull” attribute.

The second table, “posts,” will contain six columns: id, blog (i.e. the corresponding blog the post is in), post_title, post_content, post_timestamp, and wallet_address. Also, note the data types and attributes:
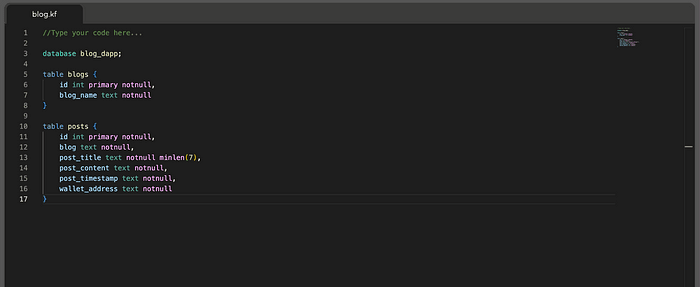
Next, we will define our actions for our database. Actions are predefined SQL statements that can be called after the database is deployed to execute CRUD operations on the database.
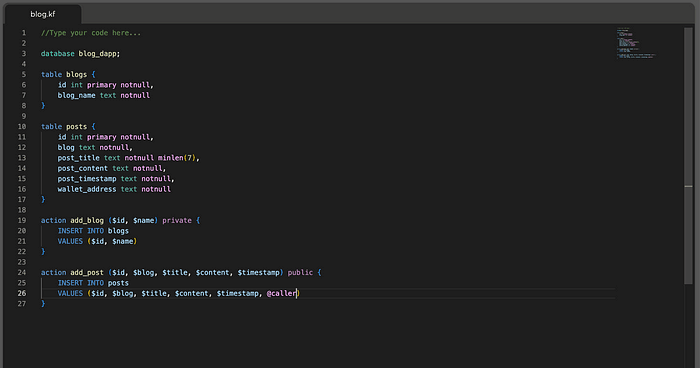
First, we must define an action to add records to the “blogs” table. Let’s define an action called “add_blog”. The action will take two arguments: “$id”, and “$name”. Action arguments must be prepended with a “$”. The action will be private, meaning only the wallet that deploys the database can call the action (versus a public action, which could be called by anybody). Inside the brackets, we will write a standard SQL insert query:
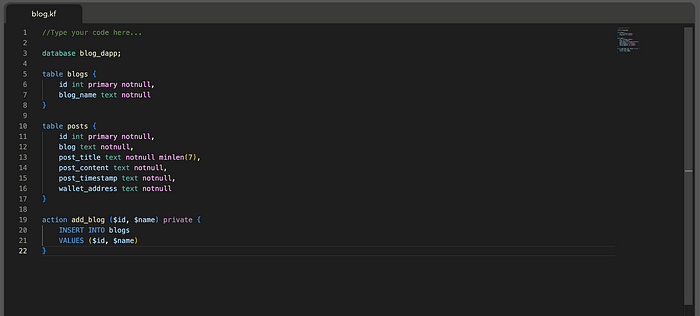
Next, we need to create actions for the posts table. All of these actions will be public. The first action “add_post”, will use the “@caller” modifier. The caller modifier is similar to Solidity’s msg.sender. On Kwil, “@caller” will retrieve the signer’s wallet address and automatically include it as an input in the query. This allows us to tie specific database records to a particular wallet/owner:
Next, the database needs two more actions: an update action that allows users to update posts they create and a delete action that allows users to delete posts they create.
How can we restrict queries so that users can only update or delete records that they created? This is exactly where the caller modifier is helpful!
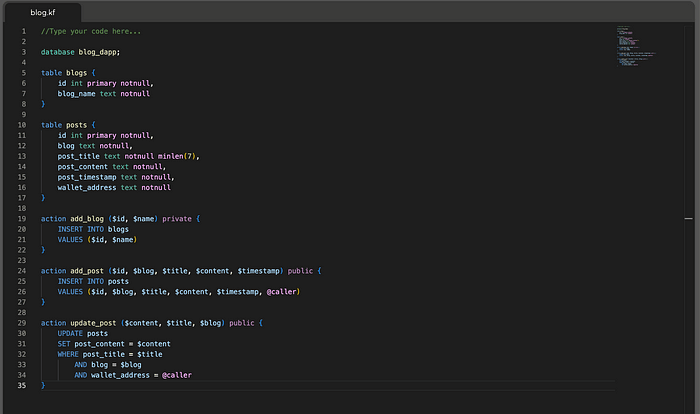
Below, we will define an update action that updates the post_content column where the wallet_address, post_title, and blog columns equal a certain value. We will add a caller modifier to the wallet_address clause, effectively ensuring that users can only update records that contain their wallet address:
The last action needed on the posts table is a delete action. Like the update query, we want to ensure that users can only delete records containing their wallet addresses. Let’s define a delete query, “delete_post” that executes where wallet_address, post_title, and blog equal a specified value. Again, we will add a caller modifier to the wallet_address clause:

And that is it! The last step is to toggle to the third “deploy” tab. From the dropdown menu, select the “blog.kf” file and click compile. If the database successfully compiles, click deploy. Once the database successfully deploys, it will be live on the Kwil network!

Executing Queries: Creating a New Blog
Now that the database has been created, let’s return to the blogging dApp and use the Kwil SDK to execute actions.
The first piece of functionality needed is the ability to create new blogs. To do this, we will use the “add_blog” action previously defined.
To execute a query, we must first retrieve the database identifier (dbid). We can then call the ActionInput() class (imported from Utils) to begin constructing the ActionInput. For a single action input, we can call .put() for each action field, followed by the value. In the example below, I reference the array with the blog names (which we will configure later) to auto-increment the “$id” input.
You can find the NewBlog.js file here.
// src/components/sideBar-components/NewBlog
import { kwil } from "../../webKwil";
import { Utils } from "kwil";

export default function NewBlog({ blogs }) {
 /* other code */
 async function createBlog(name) {
   const dbid = kwil.getDBID("your_wallet_address", "blog_dapp");
   let input = new Utils.ActionInput()
     .put('$id', blogs.length)
     .put('$name', name);
 };
};
After setting the inputs, we must build the transaction and broadcast a new transaction to the Kwil network. To build the transaction, we must pass the dbid, action name, the action inputs, and a signer. We will use ethers.js to get the signer for the wallet:
// src/components/sideBar-components/NewBlog
import { kwil } from "../../webKwil";
import { Utils } from "kwil";
import { BrowserProvider } from "ethers";

export default function NewBlog({ blogs }) {
 /* other code */
 async function createBlog(name) {
   const dbid = kwil.getDBID("your_wallet_address", "blog_dapp");
   let inputs = new Utils.ActionInput()
     .put('$id', blogs.length)
     .put('$name', name);

   const provider = new BrowserProvider(window.ethereum);
   const signer = await provider.getSigner();

   const actionTx = await kwil
     .actionBuilder()
     .dbid(dbid)
     .name('add_blog')
     .concat(inputs)
     .signer(signer)
     .buildTx();

   return await kwil.broadcast(actionTx);
 };
};
That is all we need to execute the “add_blog” query! Now, the database owner should be able to use the new blog interface in the dApp.

Viewing Existing Blogs
To load the existing blogs, we can query against the “blogs” table. On Kwil, you can use standard SELECT statements to read data.
Like the insert query above, the first step to executing a SELECT query is to retrieve the DBID. Then, you can call kwil.selectQuery() and pass in the DBID and your SELECT query. In the function below, I also created a simple helper function, “organizeBlogName()” to organize the data returned from the query. You can view the function in the entire file here.
// src/components/sideBar-components/BlogMenu
import { kwil } from "../../webKwil";
import { useState } from "react";

export default function BlogMenu({ blogs, setBlogs }) {
 /* other code */

 async function listBlogs() {
   const dbid = kwil.getDBID("0xdB8C53Cd9be615934da491A7476f3f3288d98fEb", "blog_dapp");
   const blogList = await kwil.selectQuery(dbid, "SELECT blog_name FROM blogs");
   setBlogs(organizeBlogName(blogList.data));
 };

 /* other code */
};
Now, we can see all of the blogs that have been created in our application:

Executing Actions: Writing and Reading Blog Posts
Insert Query — Adding a blog post
Now that we can create new blogs, it is time to write individual blog posts.
You may remember that when the database was created, we created an action called “add_post.” We will execute that action against the “posts” table whenever a user publishes a blog post.
Executing the “add_post” action follows the same process as the “add_blog” action from earlier:
You can find the NewPost.js file here.
// src/components/body-components/NewPost.js
import { kwil } from "../../webKwil";
import { Utils } from "kwil";
import { BrowserProvider } from "ethers";

export default function NewPost({ blogRecords }) {
 /* other code */

 async function createPost(title, content) {
   const dbid = kwil.getDBID("0xdB8C53Cd9be615934da491A7476f3f3288d98fEb", "blog_dapp");

   const input = new Utils.ActionInput()
     .put('$id', blogRecords + 1)
     .put('$blog', currentBlog)
     .put('$title', title)
     .put('$content', content)
     .put('$timestamp', new Date().toString());

   const provider = new BrowserProvider(window.ethereum);
   const signer = await provider.getSigner();

   const actionTx = await kwil
     .actionBuilder()
     .dbid(dbid)
     .name("add_post")
     .concat(input)
     .signer(signer)
     .buildTx();

   return await kwil.broadcast(tx);
 };
};
You may have noticed we did not set an input for the “wallet_address” column. That is because the “wallet_address” column had a caller modifier — the user’s wallet address will automatically be inserted when the user executes the query!
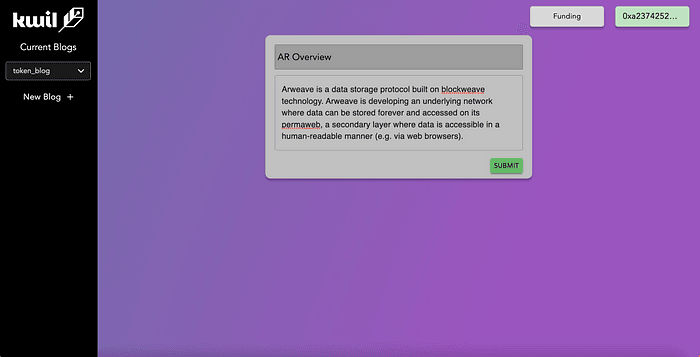
That is all that is needed to execute the “add_post” query! Now, we should be able to use the NewPost interface in the sample blogging dApp:
Reading Data — Loading existing blog posts
After a new record has been stored in the database, the next logical step is to read that data back into the application. Once again, we will use a SELECT statement to retrieve this information. In our SELECT, we must filter by the “blog” column, thus ensuring that users only look at blog posts within the blog they selected.
You can find the Body.js file here.
// src/components/Body.js
import { kwil } from "../webKwil";

export default function Body() {
 /* other code */
 async function getPosts(currentBlog) {
   const dbid = kwil.getDBID("your_wallet_address", "blog_dapp");

   const query = await kwil.selectQuery(dbid,
     `SELECT post_title, post_content, post_timestamp, wallet_address
      FROM posts
      WHERE blog = '${currentBlog}'
     `);

     return query.data;
   };
   /* other code */
};
The query returns an array of objects. Each object contains that data for a row in the posts table. We can then use that array to populate the application with the existing blog posts.

Update Query — Updating a blog post
The next step is to use the “update_post” action to update existing database records. The process is nearly the same as executing the “add_post” action, except now we only have to set inputs for the “$content,” “$title,” and “$blog” action inputs. This action also contains a caller modifier, so we do not need to provide a wallet address.
You can find the PostCard.js file here.
// src/components/body-components/PostCard.js
import { kwil } from "../../webKwil";
import { Utils } from "kwil";
import { BrowserProvider } from "ethers";

export default function PostCard({ currentBlog }) {
 /* other code */

 async function editBlog(title, newContent) {
   const dbid = await kwil.getDBID("your_wallet_address", "blog_dapp");

   const input = new Utils.ActionInput()
     .put('$content', newContent)
     .put('$title', title)
     .put('$blog', currentBlog);

   const provider = new BrowserProvider(window.ethereum);
   const signer = await provider.getSigner();

   const tx = await kwil
     .actionBuilder()
     .dbid(dbid)
     .name("update_post")
     .concat(input)
     .signer(signer)
     .buildTx();

   return await kwil.broadcast(tx);
 };
 /* other code */
};
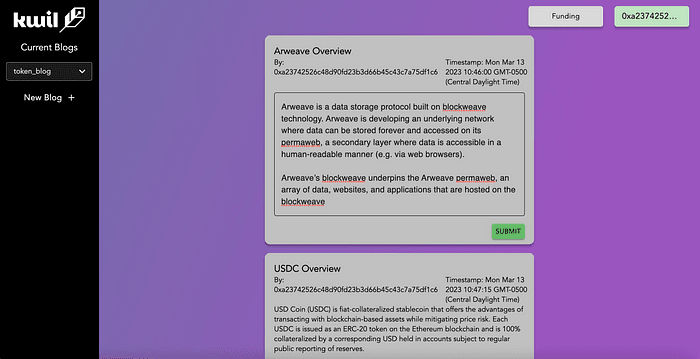
Now, users can update posts that they created. If a user tries to update a post they did not create, the database will reject the query because their wallet address is not associated with the post’s record in the database.
Delete Query — Deleting a blog post
The last piece of functionality that I have yet to demonstrate is how to use the “delete_post” action. You might have inferred that a delete query uses the same process as the insert and update actions — and you are correct! For the “delete_post” action, there are only two where clauses we have to set inputs: “$title” and “$blog”. There is a caller modifier for the wallet_address column, so there is no need to set an input:
// src/components/body-components/Postcard.js
import { kwil } from "../../webKwil";
import { Utils } from "kwil";
import { BrowserProvider } from "ethers";

export default function PostCard({ currentBlog }) {
 /* other code */

 async function deleteBlog(title, currentBlog) {
   const dbid = kwil.getDBID("0xdB8C53Cd9be615934da491A7476f3f3288d98fEb", "blog_dapp");

   const input = Utils.ActionInput.of()
     .put('$title', title)
     .put('$blog', currentBlog);

   const provider = new BrowserProvider(window.ethereum);
   const signer = await provider.getSigner();

   const tx = await kwil
     .actionBuilder()
     .dbid(dbid)
     .name("delete_post")
     .concat(input)
     .signer(signer)
     .buildTx();

   return await kwil.broadcast(tx);
 };
};
Similar to the update query, if a user tries to delete a post they did not create, the database will reject the query because their wallet address is not associated with the post being deleted.
If you made it this far, congratulations! You can now create a CRUD application with a decentralized and permissionless relational database.
Conclusion
Through this sample blogging dApp, I demonstrated how to integrate Kwil to build customized, permissionless, decentralized relational data structures. The use cases for building on Kwil are endless, and permissionless relational data will unlock new use cases in DeFi, DeSci, decentralized social, decentralized analytics, and Web 3.0 as a whole.
If you want to learn more, please visit our documentation here. We also have a GitHub repo that covers many of the same concepts in this blog.
If you have any questions, please do not hesitate to contact [email protected], or connect with us in our Discord!
#BuildWithKwil
