Introducing the Kwil CLI

Welcome to the Kwil CLI guide on how to interact with your deployed databases! We will go over how to use the Kwil CLI to view, fund, query, and drop a database.
Before diving in, make sure you have already deployed a Kwil database. The easiest way to do so is through the DB builder.
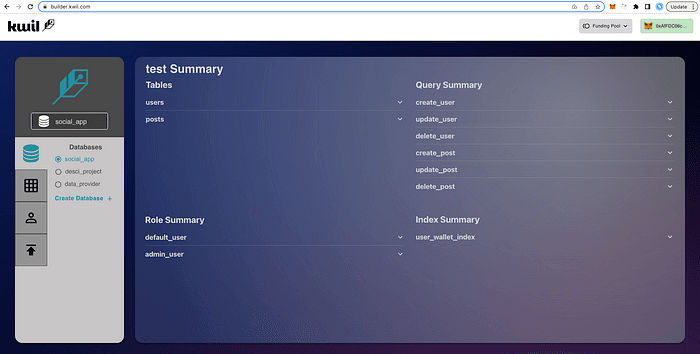
Above is a sample social_app database I created with two simple tables: users and posts. Each table contains an insert, update, and delete query for modifying table records. The database has two roles: default_user and admin_user. Default_user only has access to the insert and update queries, whereas admin_user has access to all queries. For the purpose of this tutorial, we will be focusing on the create_user query within the users table.
To get started you will need to install the CLI binaries for your desired operating system. To make following the tutorial more seamless, I recommend you set up the kwil-cli alias. Setting it up requires the following terminal command:
alias kwil-cli= path-to-kwil-cli-binaryWe can verify that the alias has been properly set up by initializing the CLI.
kwil-cli
Initializing the CLI will allow you to start the configuration process. Here you define the default values for your CLI. These default values are stored on your machine and persist between sessions. To start the configuration run the following command:
kwil-cli configureIn the configure menu, you can set your Kwil RPC URL, your private key, and your Client Chain RPC URL.

Kwil RPC URL serves as your network gateway for all functions, except for token approval, total deposit balance inquiry, and utilities. It refers to the URL of the Kwil provider that you are accessing.
Note: The current Kwil GRPC URL can be found here.
Private Key is responsible for signing transactions and never leaves your client.
Note: Kwil only accommodates keys that are compatible with EVM chains, but we intend on including more options in the future.
Client Chain RPC URL is the chain provider for the chain on which your deposit smart contract lives. In this example I used a public Alchemy Goerli chain provider. You can get an RPC URL here.
Now that we have the CLI configured, we can go ahead and view our database in the terminal. The easiest way to do this is through the list command.
kwil-cli database listHere you will see all databases you have deployed using your configured wallet.

If you wish to see databases from another wallet address, pass the owner flag containing the desired wallet address:
kwil-cli database list --owner= walletAddressNow that we can see the “social_app” database is listed, we can go ahead and display its schema by passing the name of the desired database as your flag.
kwil-cli database read-schema --name= dbName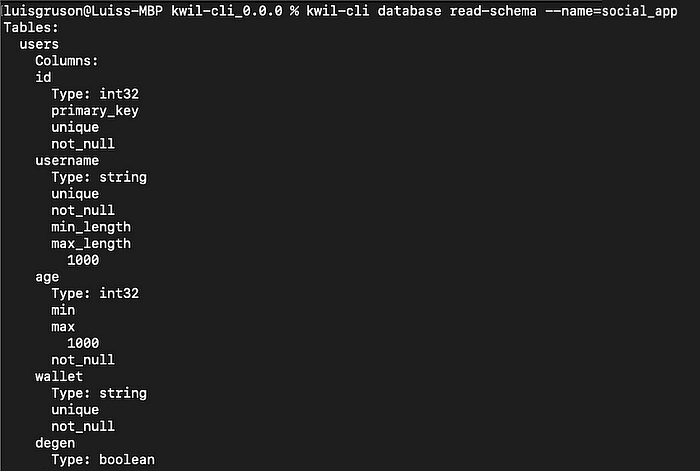
Now that we have verified that our database has been properly deployed, we can go ahead and configure our funding. We can start by getting an overview of our account’s data from the Kwil network.
kwil-cli fund get-account
Note: Please help yourself to some KWIL Beta Testnet Tokens by clicking on the link to the faucet here.
Get-Account will return your current spent and unspent balance on the Kwil network as well as our account nonce.
Next, we can call fund balances to see our on-chain account balance, which contains the current allowance and balance from our wallet address.
kwil-cli fund balances
As we currently have no allowance, the next step is to approve funds to be withdrawn from the Goerli testnet onto the Kwil network.
Note: The amount being approved is not tokens but 1 decimal of a token (Kwil beta tokens have the standard eighteen decimals). So to approve 1 token it is 1 x 1*(018)
kwil-cli fund approve amount
Once approved, we can go ahead and confirm that the on-chain allowance increased by 100.

Now that we have confirmed the token approval, we can deposit those funds into the Kwil funding pool.
kwil-cli fund deposit amount
We can now go ahead and view our account balance and see that the total available balance of 100 has been transferred from the total on-chain balance.


Now that we’ve completed our funding process, we can go ahead and execute a query from our “social_app” database. In order to do so, you must pass in the desired query name, database name, and owner wallet address as flags. Each prepared SQL statement has a predefined set of parameters that are to be passed as arguments into the terminal.

To specify the database you want to target, we will pass the database owner address and name. Similar to the read-schema command, if you only pass a name flag, it will auto-fill your configured address.
To execute a query, you need to specify the name of the query and its input parameters as arguments. For each parameter within the query, you will need to specify its name followed by its value. The basic syntax for executing queries is as follows:
kwil-cli database execute param1 input_1 param2 input_2 param3 input_3 --query= query_name --name= name --owner= owner_address
Upon a successful query execution you will receive a hash of the transaction as well as its cost.
Now to run full circle, let’s go ahead and drop our “social_app” database. Any database that is deployed with the configured wallet can be dropped using the drop command, which requires the the desired database name as an argument.
kwil-cli database drop dbNameOnce successfully executed, we will be returned a transaction hash and fee. To confirm that this transaction was successful, we can go ahead and list our databases and see that the “social_app” database is no longer included.

Note: The ability to drop a database is unique to the CLI.
Conclusion
The Kwil CLI is one of the many tools to interact with your Kwil databases. While we do not recommend building databases directly from the CLI, users seeking alternatives to our current javascript/typescript SDK, as well as those looking for unique features such as the ability to drop databases, can access all the same functionality as our other database interaction solutions.
If you have any questions, please do not hesitate to contact [email protected], or connect with us in our Discord!
#BuildWithKwil
